
In my earlier post, I have used ExportToPackage API to extract customer reason codes data package. Below are the reason codes available in the demo data which I exported.

In this blob article, we will see how we can import data package using Data management package REST API from the azure blob storage.
For the demonstration purpose I have added new reason code highlighted below in the file and zipped that file to create data package. You can use any automated process to do this.

I have created following two containers in the Azure blob storage.
- D365files – I uploaded my data package in this container
- Processedpackages – Once the data package is processed successfully, it is moved in this container.
Here are high level steps for importing data package from blob storage in Dynamics 365 for Finance and operations.
- Upload your data package to blob storage.
- Create Power automate flow which will be triggered manually and add the steps to read file from the Azure blob storage. For the scope of this blog I am reading a single file by specifying a filename. You can use list file from the blob action to list all the files from the blob and import it one by one.
- Get the F&O blob storage writable URL using GetAzureWriteUrl API. This is the path where we are going to upload data package.
- The next step is to parse the response from GetAzureWriteUrl to separate out the blob Id and Blob URL.
- Once you get the URL , upload the package to blob using HTTP trigger and write the content of the file we got from the azure blob storage.
- If the upload process fails send an alert email else call the ImportFromPackage API.
- Call the ImportFromPackage API and pass the blob associated with F&O instance to trigger the import process.
- Check the status of import process till it succeeds.
- Once the import is successful move the file from blog folder to Processed folder (In my scenario I moved file from d365files blob container to processedpackages container)
- Once the file is moved to process folder, delete the file from container d365files.
- If the
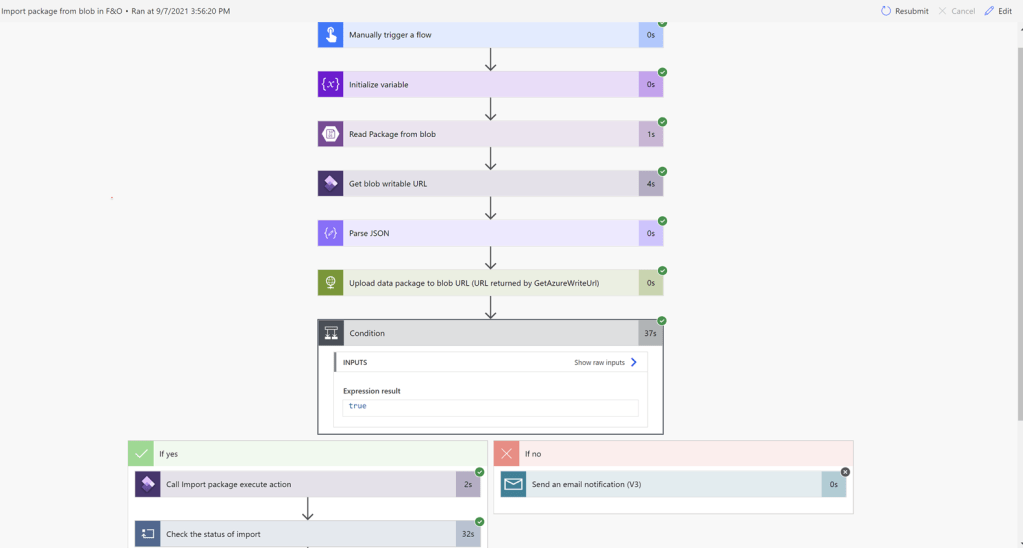
Now let’s go through each step of the power automate flow in detail to understand what needs to be done to automate the import process.
In the first step I am triggering the flow manually and then initialize string variable execution status. I will explain about how this variable is used in the later steps.

The next step is to read data package from the blob. You can use storage explorer or directly azure portal to upload to file to the blob. Also, you can use custom .net code to upload data package to the blob from any other third-party application.

In the below two steps, I am getting writable URL using GetAzureWriteUrl API and using parseJSON action to parse the output from the API to get unique blob Id and blob URL which we will use in the next step to upload the package.
GetAzureWriteUrl returns output in the following format.
{
“@odata.context”: “https://xxxx4c66cb53d7aa3b83devaos.cloudax.dynamics.com/data/$metadata#Edm.String”,
“value”: “{\”BlobId\”:\”{C5753D4F-FDAD-4B49-9350-88D242A35D6F}\”,\”BlobUrl\”:\”https://xxxxf22c162fbbc9cb91.blob.core.windows.net/dmf/custReasnCodes?sv=2014-02-14&sr=b&sig=be%2FBIk6SoLk5R8IrniABYJJnSO%2F4GdCtE16yS6t6jfU%3D&st=2021-09-07T22%3A51%3A26Z&se=2021-09-07T23%3A26%3A26Z&sp=rw\”}”
}
Remember the URL we get using this step does not have any file yet, so if you paste it in browser you are not going to get anything downloaded.

In the below step, I am uploading the file which we read from the blob to the URL returned by above step using HTTP trigger.
Remember to set header as x-ms-blob-type and its value as BlockBLob.

Once you get the success code, you are good to call ImportFromPackage API. In the following step, I am calling import from package API and passing blob url where package is uploaded.

Next we check the status of execution using the below step and setting the value of the execute status variable defined in the very first step to succeeded.

Finally, using below two steps I moved the file from d365files container to processedPackages container and delete file from d365file container.

After successful execution of flow ‘ASP’ the new reason code is created in F&O.

That’s all for now. Feel free to comment and post questions if you have any.

Hi, I am reading the package file from SharePoint but it is not getting back to D365 for some reason. Is there any way you can help me on this ?
LikeLike
Hi I am unable to use GetAzureWriteUrl in power automate how we can use this action ?
LikeLike
What do you mean you are unable to use ? Are yo getting any error ?
LikeLike